How to get air bubbles out of a screen protector
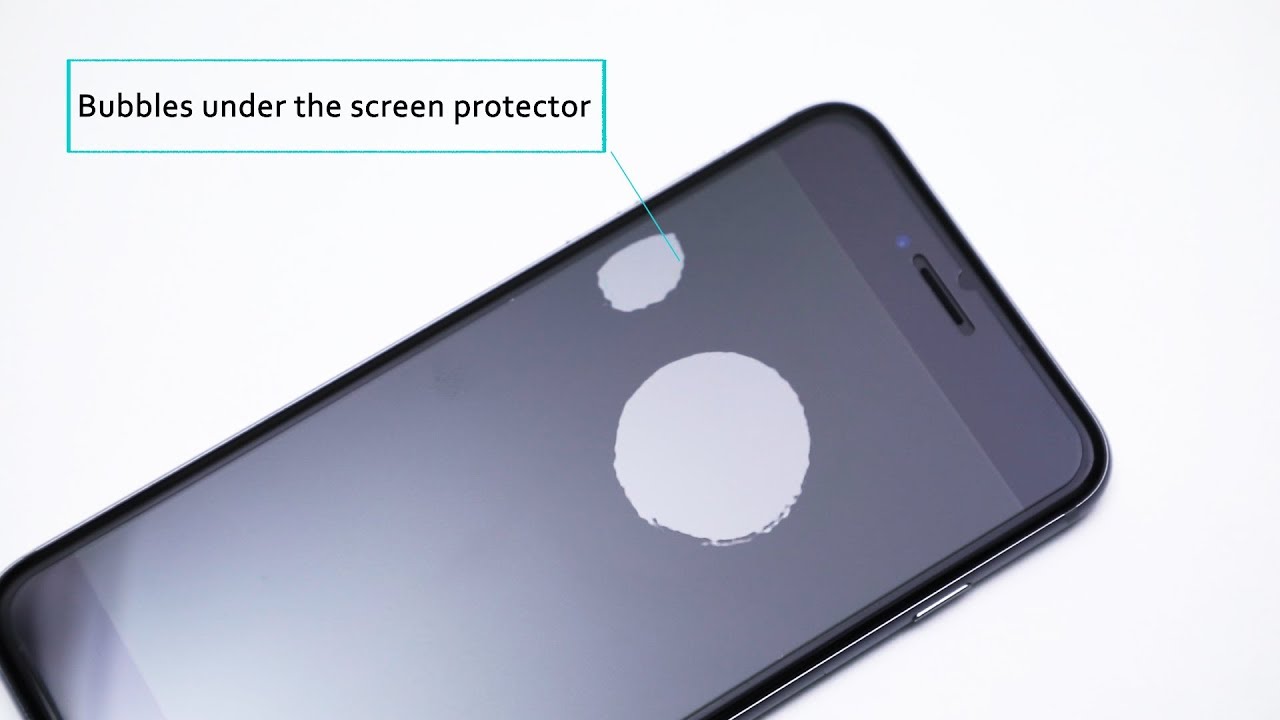
Applying a screen protector can be frustrating when air bubbles form underneath it. Air bubbles disturb the clarity and touch sensitivity of the device, affecting the aesthetics of the phone's screen protection. The bubbles are common for even the best screen protectors. Luckily, there are methods to resolve this problem and restore your screen's smooth, bubble-free surface.
Ways to Remove Air Bubbles from Screen Protector
Step 1: Clean Your Screen Properly
Before applying a screen protector, clean your screen thoroughly. Even if your screen is the best screen protector, it can become dusty or have lint remains on the surface. Use a microfiber cloth or the cleaning kit that usually comes with a protector to wipe away any dust particles. Gently wipe in circular motions to pick up even the tiniest debris that could lead to air bubbles in the screen protector later on.
Avoid using tissues or paper towels, as these materials can leave behind fibres. Preferably, use a dedicated alcohol wipe for tougher smudges. If you’re dealing with an iPhone 13 Tempered Glass Screen Protector Guard or an iPhone 14 Tempered Glass Screen Protector, a clean screen makes sure the protector adheres properly with the phone.
Step 2: Apply the Screen Protector in a Dust-Free Environment
Choosing the right environment for application is crucial in reducing air bubbles. Ideally, apply the protector in a room with less dust or in the bathroom after running a hot shower for a few minutes, as the steam helps to trap airborne dust particles.
Begin with aligning the screen protector from the top of your device and slowly lower it into place, making sure it’s centred. For example, when applying a screen cover for iPhone 13 or iPhone 14, align the cover over the phone’s front panel. Once aligned, press down gently in the centre of the protector and let it adhere naturally to the screen.
Step 3: Press Out Air Bubbles From the Center in an Outward Direction
If you notice any air bubbles in the screen protector after applying it, don’t worry. Start by applying gentle pressure at the centre of the screen protector using a clean, soft cloth or your fingers. Push the bubbles outward toward the edges, using smooth, even strokes.
Sometimes, the air bubbles are caused by improper alignment or the protector not being fit properly in the screen. For best results, use a high-quality iPhone 14 Tempered Glass Screen Protector Guard, if you have an iPhone. Press gently but firmly, focusing on small sections at a time, to not damage the protector.
Step 4: Use a Credit Card or Applicator Tool
Many screen protectors come with a small plastic applicator tool that can be used to remove air bubbles. If your protector did not come with an applicator, a credit card works just as well. Wrap a microfiber cloth around the card to avoid scratching the protector, then push the bubbles toward the edges.
Apply pressure and work from the centre outward, being careful not to lift or shift the protector in the process. Note that you can use the applicator for all the devices, including the latest iPhone 13 Pro Max Tempered Glass Screen Protector Guard. Slow, deliberate motions will ensure the protector lays flat, and most air bubbles can be worked out this way.
Step 5: Lift the Screen Protector for Stubborn Bubbles
If certain air bubbles persist, they may be the result of trapped dust or improper alignment. You can fix this by carefully lifting the screen protector and reapplying it. Start at one corner and slowly peel it back, avoiding any quick motions that could crease or damage the protector.
Once the protector is lifted, check the screen on both sides. This is to make sure the [rotector is fitting in properly. If you find debris, use a small piece of adhesive tape to lift off any dust or lint particles from the screen or protector. Afterwards, realign and reapply the screen protector, making sure to press out any air bubbles once again from the centre outward.
Step 6: Use Heat to Remove Air Bubbles
For more stubborn air bubbles in the screen protector, gentle heat can help. A blow dryer set to a low, cool setting can soften the adhesive slightly, making it easier to push out the air bubbles. Hold the blow dryer about six inches from the screen and move it back and forth for a few seconds. Avoid overheating, as too much heat can damage both the screen and the protector, especially when using sensitive materials like those found in the best screen protectors.
Once the adhesive is warm, use the microfiber cloth or credit card to smooth out the bubbles again, pushing them toward the edges. This technique can be particularly helpful for smaller air bubbles that just won’t budge with regular pressure.
Step 7: Consider Reapplying the Protector or Trying a New One
If you’ve tried all these steps and still have air bubbles in the screen protector, you need to start all over again. Remove the screen protector entirely and thoroughly clean the screen. You can try reapplying the same protector, but as it must have lost its adhesiveness, you may need a new one.
With so many types of screen protectors on the market, from film to tempered glass, it is necessary to choose one that’s not only compatible with your device but also easy to apply without bubbles. Whether you’re using a basic film or an iPhone 13 screen protector, an undamaged protector can be a suitable option for achieving a bubble-free finish.
Step 8: Prevent Air Bubbles in the Future
To avoid the hassle of air bubbles in the screen protector, take preventive steps during application. First, always clean your screen thoroughly before applying a new protector. Don’t be in a rush to complete the process. Carefully align the protector and press from the centre out to ensure a smooth, bubble-free application.
Additionally, choosing high-quality screen protectors can make a significant difference. The best screen protectors often come with anti-bubble properties, making the application process smoother and reducing the chances of bubbles forming. Brands offering iPhone 13 and iPhone 14 case protectors can be incorporated into your phone.
Frequently Asked Questions
Is there a specific time of day that’s best for applying a screen protector to avoid bubbles?
It's best to apply your screen protector during the day in good lighting conditions. This allows you to see any dust or air bubbles clearly and ensures a more precise application. Applying the protector in low light might cause you to miss small imperfections that can lead to further formation of air bubbles.
Can air bubbles form under a screen protector even after it’s been on for a long time?
Yes, air bubbles can still form under a screen protector if the adhesive wears out or the protector shifts due to impact or heat. Regularly check your screen protector to ensure it's still fully adhered to.
Can air bubbles form due to temperature changes?
Yes, extreme temperature changes can cause the adhesive on your screen protector to contract or expand, which may lead to air bubbles forming over time. To minimise this risk, avoid leaving your phone in hot environments, such as a car dashboard in summer.
Can I reuse the same screen protector if I remove it to fix air bubbles?
While some screen protectors can be reapplied, it’s best not to reuse them, as they have already collected debris or lost their adhesiveness. Choose to fix a new screen protector to avoid getting air bubbles.





Leave a comment
All comments are moderated before being published.
This site is protected by hCaptcha and the hCaptcha Privacy Policy and Terms of Service apply.